> ## Documentation Index
> Fetch the complete documentation index at: https://auth0.generaltranslation.app/llms.txt
> Use this file to discover all available pages before exploring further.
> Learn how to configure additional signup steps using Forms for Actions
# Use Cases: Configure additional signup steps using Forms
1. Create a [Machine-to-Machine Application](/docs/get-started/auth0-overview/create-applications/machine-to-machine-apps) with the following scopes enabled:
* `read:users`
* `update:users`
* `create:users`
* `read:users_app_metadata`
* `update:users_app_metadata`
* `create:users_app_metadata`
2. Add a [Vault connection](/docs/customize/forms/vault) using the M2M application credentials.
Forms for Actions allows you to create additional steps in your signup or login flows and make them required before allowing users to access your application.
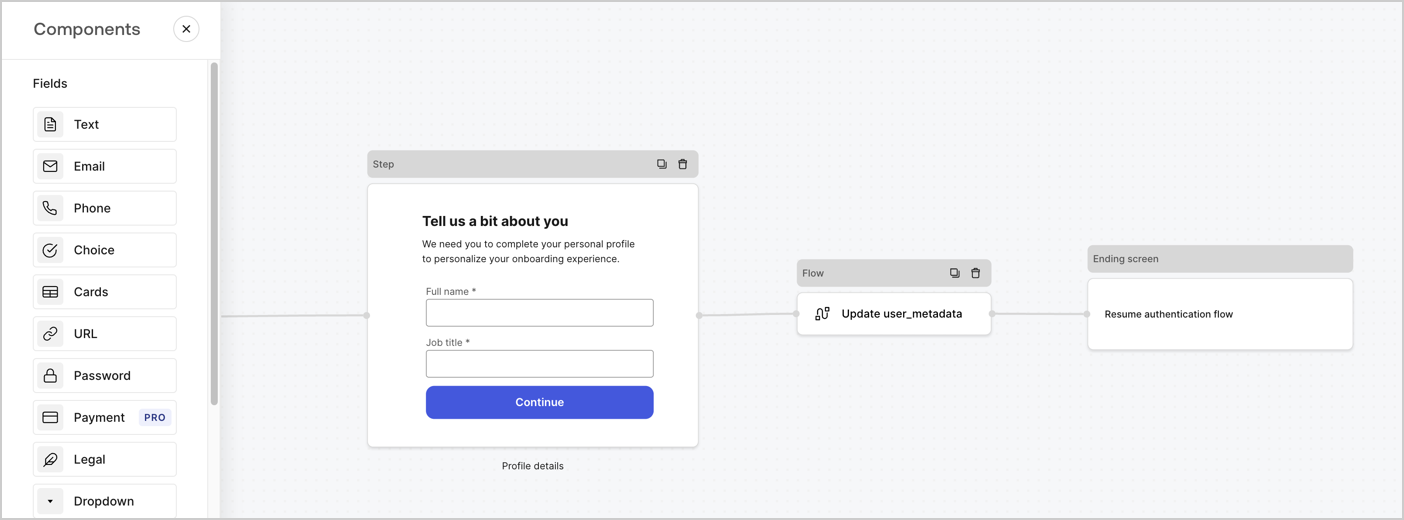 The sections below outline how to create additional signup steps forms using nodes and flows, along with steps for adding your form to a [Post Login](/docs/customize/actions/explore-triggers/signup-and-login-triggers/login-trigger) Action.
## Create a form from scratch
Follow these steps to create a form to gather information:
1. Open the Form editor by selecting **Auth0 Dashboard > Actions > Forms.**
2. Select **Create Form** > **Start from scratch**.
By default, a new form contains a Start node, a Step node, and an Ending screen node.
The sections below outline how to create additional signup steps forms using nodes and flows, along with steps for adding your form to a [Post Login](/docs/customize/actions/explore-triggers/signup-and-login-triggers/login-trigger) Action.
## Create a form from scratch
Follow these steps to create a form to gather information:
1. Open the Form editor by selecting **Auth0 Dashboard > Actions > Forms.**
2. Select **Create Form** > **Start from scratch**.
By default, a new form contains a Start node, a Step node, and an Ending screen node.
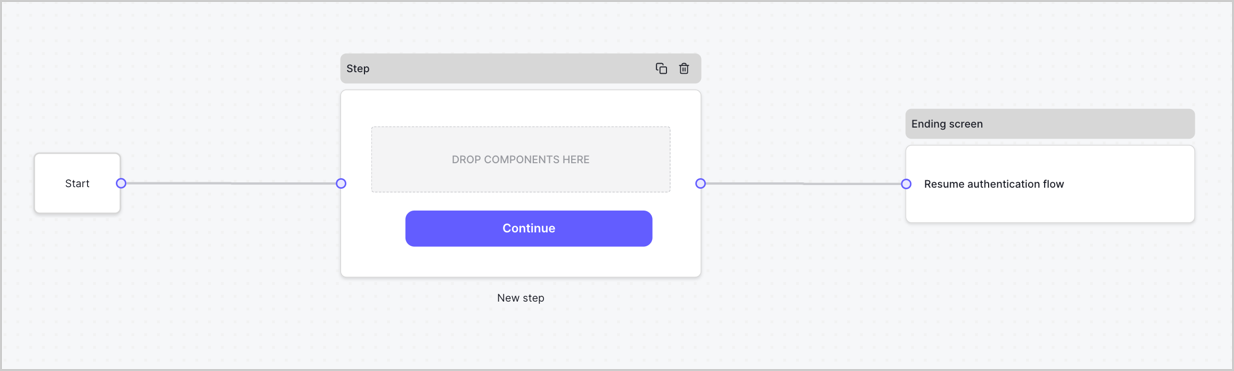 ### Configure the Step node
The Step node is the graphical interface visible to users. Add [Fields](/docs/customize/forms/nodes-and-components) to the Step node to collect the user's full name and job title values by following these steps:
1. Drag a **Rich text** field from the **Components menu** into the **Step** node.
* **Rich text**: Enter a custom message.
* Select **Save**.
2. Drag a **Text** field into the **Step** node.
* **ID**: Enter `full_name`.
* **Label**: Enter `Full name`.
* **Label**: Enable the checkbox.
* **Required**: Enable the checkbox.
* Select **Save**.
3. Drag a **Text** field into the **Step** node.
* **ID**: Enter `job_title`.
* **Label**: Enter `Job title.`
* **Label**: Enable the checkbox.
* **Required**: Enable the checkbox.
* Select **Save**.
4. Select **Publish** to save.
### Configure the Step node
The Step node is the graphical interface visible to users. Add [Fields](/docs/customize/forms/nodes-and-components) to the Step node to collect the user's full name and job title values by following these steps:
1. Drag a **Rich text** field from the **Components menu** into the **Step** node.
* **Rich text**: Enter a custom message.
* Select **Save**.
2. Drag a **Text** field into the **Step** node.
* **ID**: Enter `full_name`.
* **Label**: Enter `Full name`.
* **Label**: Enable the checkbox.
* **Required**: Enable the checkbox.
* Select **Save**.
3. Drag a **Text** field into the **Step** node.
* **ID**: Enter `job_title`.
* **Label**: Enter `Job title.`
* **Label**: Enable the checkbox.
* **Required**: Enable the checkbox.
* Select **Save**.
4. Select **Publish** to save.
 ### Configure the Flow node
Add a **Flow** node after the **Step** node to update the `user_metadata` and resume the authentication flow by following these steps:
1. Select **Flow** from the bottom of the Form editor.
2. Remove the existing link between the **Step** and **Ending Screen** nodes.
3. Select the new **Flow** > **Click to add a flow** > **Create a new flow.**
* Enter `Update user_metadata` in the **Name** field.
* Select **Create**.
* Select **Save**.
4. Link the **Flow** node to the **Step** and **Ending Screen** nodes as pictured below.
5. Select **Publish** to save.
### Configure the Flow node
Add a **Flow** node after the **Step** node to update the `user_metadata` and resume the authentication flow by following these steps:
1. Select **Flow** from the bottom of the Form editor.
2. Remove the existing link between the **Step** and **Ending Screen** nodes.
3. Select the new **Flow** > **Click to add a flow** > **Create a new flow.**
* Enter `Update user_metadata` in the **Name** field.
* Select **Create**.
* Select **Save**.
4. Link the **Flow** node to the **Step** and **Ending Screen** nodes as pictured below.
5. Select **Publish** to save.
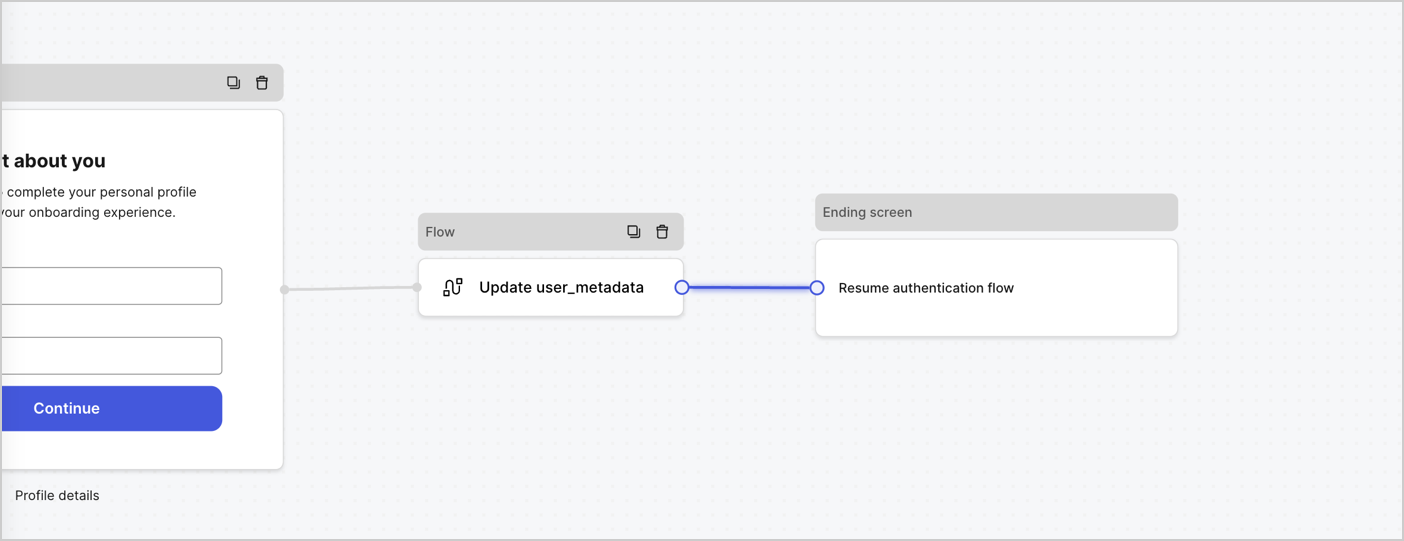 Add an Auth0 Update user action to the flow by following these steps:
1. Select the **Flow** **Update user\_metadata** > **Edit flow** to open the Flow editor in a new tab.
2. Below the StartAction, select the **+** icon to add an **Update user** Action. Complete the fields below, then select **Save** to continue.
* **Connection**: Select from the dropdown the Vault connection to your M2M application.
* **User ID**: Enter `{{context.user.user_id}}`.
* **Body**: Copy and paste the following code to update the user\_metadata with `full_name` and `job_title` properties.
```json lines theme={null}
{
"user_metadata": {
"full_name": "{{fields.full_name}}",
"job_title": "{{fields.job_title}}"
}
}
```
* Select **Save**.
3. Select Publish to save.
## Retrieve your form render code
Retrieve your form render code to visually render the form with a custom Post Login Action by following these steps:
* From the Form editor, select **`<> Render`**.
* Select **Copy**.
Add an Auth0 Update user action to the flow by following these steps:
1. Select the **Flow** **Update user\_metadata** > **Edit flow** to open the Flow editor in a new tab.
2. Below the StartAction, select the **+** icon to add an **Update user** Action. Complete the fields below, then select **Save** to continue.
* **Connection**: Select from the dropdown the Vault connection to your M2M application.
* **User ID**: Enter `{{context.user.user_id}}`.
* **Body**: Copy and paste the following code to update the user\_metadata with `full_name` and `job_title` properties.
```json lines theme={null}
{
"user_metadata": {
"full_name": "{{fields.full_name}}",
"job_title": "{{fields.job_title}}"
}
}
```
* Select **Save**.
3. Select Publish to save.
## Retrieve your form render code
Retrieve your form render code to visually render the form with a custom Post Login Action by following these steps:
* From the Form editor, select **`<> Render`**.
* Select **Copy**.
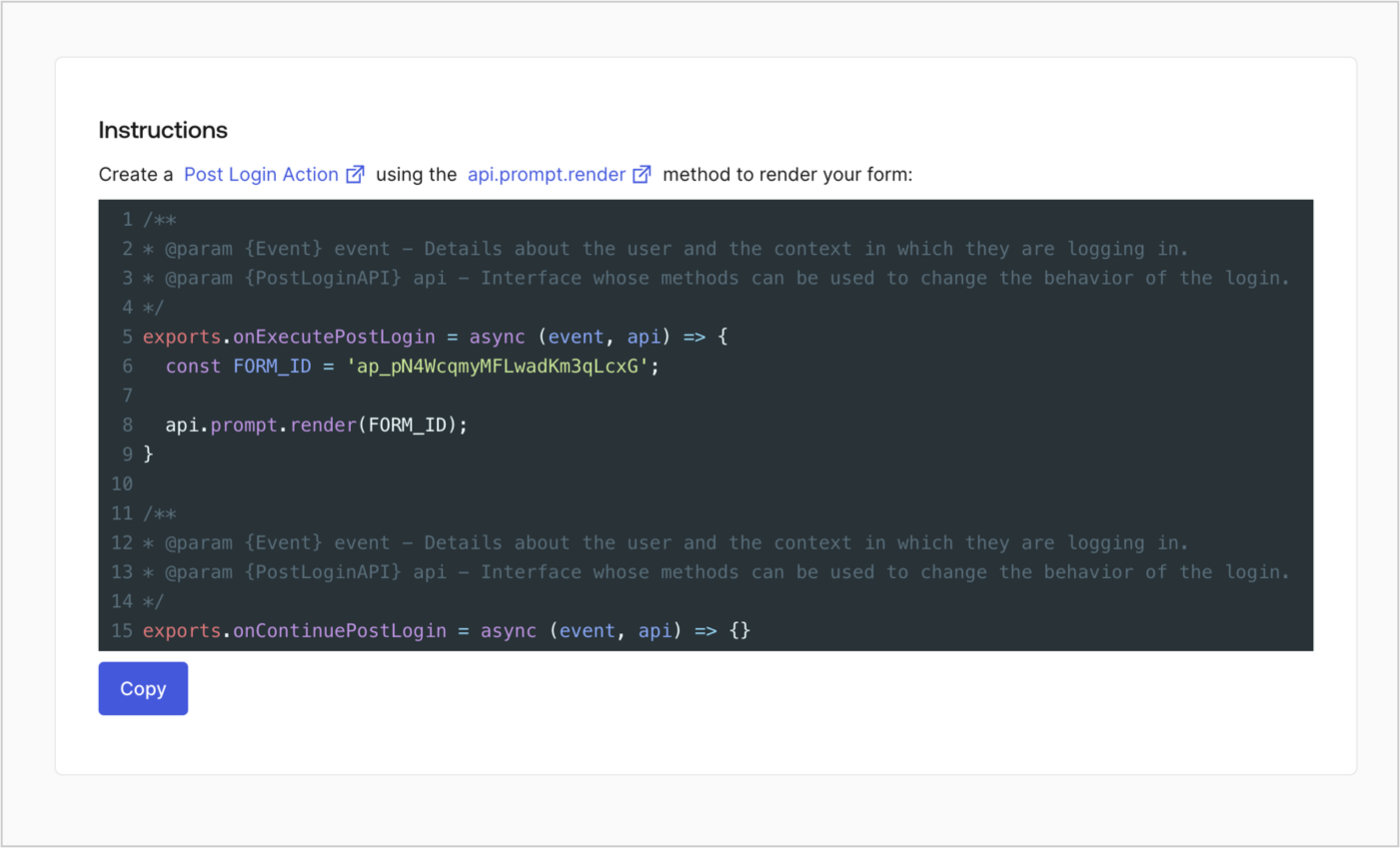 ## Create a Post Login Action
Create a post-login Action to render your form by following these steps:
1. Navigate to **Auth0 Dashboard > Actions > Flows > Login.**
2. Select the **+** icon and select **Build from scratch**:
* **Name**: Enter `Render Additional Signup Form`.
* **Trigger**: Select `Login / Post Login`.
* **Runtime**: Select the recommended version.
3. Select **Create**.
To configure the post-login Action:
1. Delete the existing code from the Code editor.
2. Paste the form render code into the Code editor.
3. Edit the code to define the conditional logic that will render the form.
```javascript lines theme={null}
/**
* @param {Event} event - Details about the user and the context in which they are logging in.
* @param {PostLoginAPI} api - Interface whose methods can be used to change the behavior of the login.
*/
exports.onExecutePostLogin = async (event, api) => {
const FORM_ID = 'REPLACE_WITH_YOUR_FORM_ID';
if (
!event.user.user_metadata.full_name &&
!event.user.user_metadata.job_title
) {
api.prompt.render(FORM_ID);
}
}
exports.onContinuePostLogin = async (event, api) => { }
```
The example code above will render the form when a user is missing the user metadata full\_name and job\_title properties.
4. Select **Deploy.**
5. Drag and Drop the **Render Additional Signup Form** Action to the **Login** flow.
## Create a Post Login Action
Create a post-login Action to render your form by following these steps:
1. Navigate to **Auth0 Dashboard > Actions > Flows > Login.**
2. Select the **+** icon and select **Build from scratch**:
* **Name**: Enter `Render Additional Signup Form`.
* **Trigger**: Select `Login / Post Login`.
* **Runtime**: Select the recommended version.
3. Select **Create**.
To configure the post-login Action:
1. Delete the existing code from the Code editor.
2. Paste the form render code into the Code editor.
3. Edit the code to define the conditional logic that will render the form.
```javascript lines theme={null}
/**
* @param {Event} event - Details about the user and the context in which they are logging in.
* @param {PostLoginAPI} api - Interface whose methods can be used to change the behavior of the login.
*/
exports.onExecutePostLogin = async (event, api) => {
const FORM_ID = 'REPLACE_WITH_YOUR_FORM_ID';
if (
!event.user.user_metadata.full_name &&
!event.user.user_metadata.job_title
) {
api.prompt.render(FORM_ID);
}
}
exports.onContinuePostLogin = async (event, api) => { }
```
The example code above will render the form when a user is missing the user metadata full\_name and job\_title properties.
4. Select **Deploy.**
5. Drag and Drop the **Render Additional Signup Form** Action to the **Login** flow.
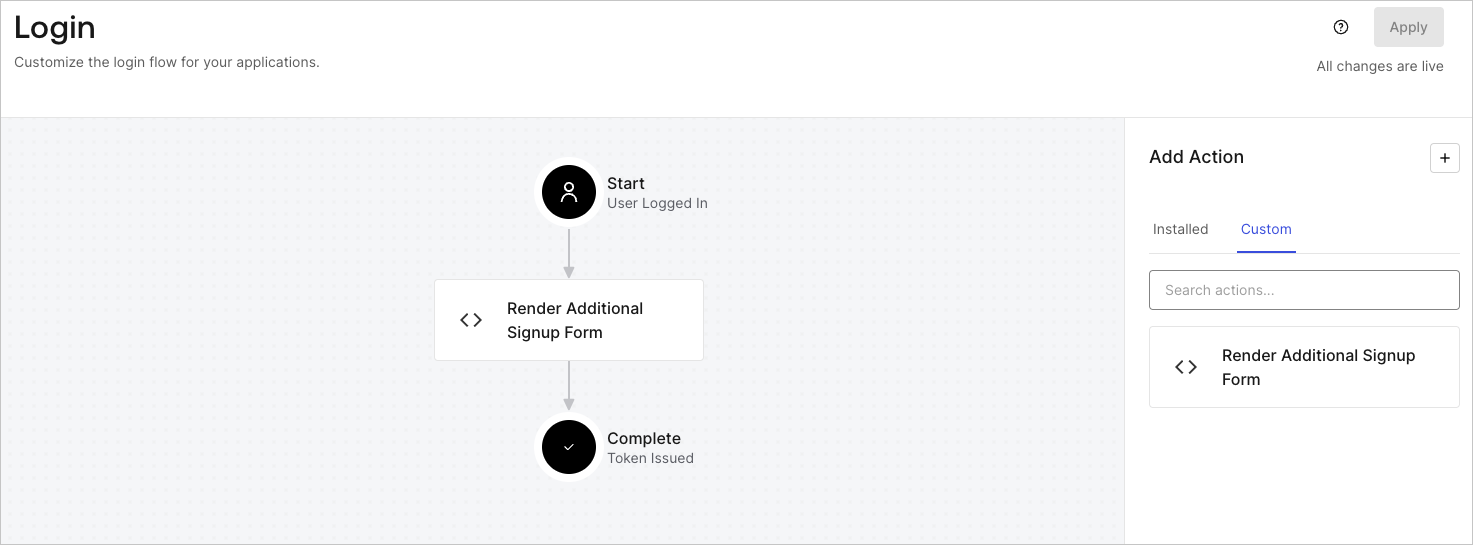 6. Select **Apply**.
### Test implementation
Test the implementation by following these steps:
* Sign up to an application with a new user.
* The post-login Action in the Login flow will render the form and prompt for the information.
* Select **Auth0 Dashboard > User Management > Users,** locate the new user, and verify that its attributes `full_name` and `job_title` contain the information from the additional signup step.
6. Select **Apply**.
### Test implementation
Test the implementation by following these steps:
* Sign up to an application with a new user.
* The post-login Action in the Login flow will render the form and prompt for the information.
* Select **Auth0 Dashboard > User Management > Users,** locate the new user, and verify that its attributes `full_name` and `job_title` contain the information from the additional signup step.